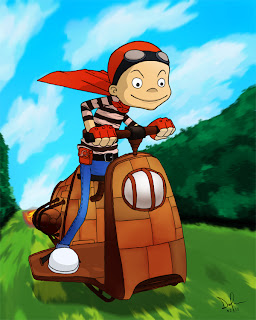
This piece is from my Image Manipulation class taken Winter Quarter 2011. The assignment goal was a sketch-ink-scan-color process. The inspiration for this was an eager young gearhead testing one of his contraptions (the scooter has a slight steampunk influence).
 |
| The inked drawing. |
I imported it into Photoshop and adjusted the Levels (Image > Adjustments > Levels or Ctrl/Cmd + L) until satisfied. The project required at least 3 layers - the outline (which was my scan), color, and values.
 |
| All layers. |
The "Drawing" layer was the scan, with transparency locked and layer mode set to "Multiply". The "Values" layer was filled with 50% gray (Edit > Fill, then select "50% Gray" from the "Contents" drop-down) and then dodged and burned for the highlights and shadows (also project requirement).
I put all colors on the "Fill" layer. Ideally, colors should be separated across several layers, but I wanted to minimize layer count and already had a clear idea of my outcome, so I colored on this layer only. I colored by selecting a desired area(s) on the Drawing layer with the Magic Wand Tool (W), expanding the selection by 1 pixel (Select > Modify > Expand...), then returning to the Fill layer and coloring in the selection. The wand selections were pretty clean (due to the clean, inked scan) and the 1px expansion took care of any unselected edge pixels; any slight gaps between the color regions were obscured by the outlines of the Drawing layer. Also note that the scooter flames were simply loosely painted with no masking involved.
 |
| Left: Color regions with gaps (outline hidden); Right: Regions obscured by outline. |
Tinkerboy and his scooter's shadow got their own tonal layers (both set to "Multiply"); selections were made with the Path tool and filled with 75% gray.
The background was also painted on a single layer. The sky and grass were painted with a round, hard brush, and then smudged. The bushes were painted with a custom brush I made in Adobe Illustrator (download the brush file - Photoshop ABR).
Finally, the background received a zoom blur effect (Filter > Blur > Radial Blur). I selected "Zoom" from the "Blur Method" option and eyeballed the focal point approximately at the vanishing point of the background.
Final result:


No comments:
Post a Comment